For the first year of brewing, I always bought yeast packets every time brewed a new batch. But I recently brewed 4 beers in the same month and realized that they were all using Wyeast 1056 and decided to look into how to reuse yeast in my homebrew.
I was a little scared at first because I’m concerned about sanitation and how it affects the quality of my brews, but in the name of experimentation I decided to go ahead and try it. It’ll save me quite a bit of money, and it’s also pretty fun to have the beginnings of my own yeast laboratory in my fridge.
Table of Contents
How To (and Why) Reuse Yeast
Why Do We Want To Reuse Yeast?
If you follow the proper procedure, for the frequent brewer, there really is not reason to NOT reuse your yeast. It’s convenient to not have to make the extra trip to the homebrew shop, and will also save you some money over time.
The Step By Step Process Of Reusing Yeast
The step by step process of rinsing your yeast to reuse in a future batch is pretty simple. Actually, I was nervous doing it my first time, but if you’ve managed to successfully brew a batch of beer already, then this will be a piece of cake.
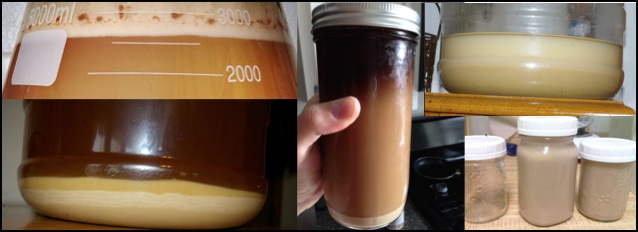
IMAGE OF YEAST + TRUBE + FISHIED YEAST (SPLIT IMAGE)
I like to think of the process in broad terms first.
- Add water to the yeast cake after transferring fermented beer to bottles or keg
- Fill initial mid-sized vessel with yeast/water slurry
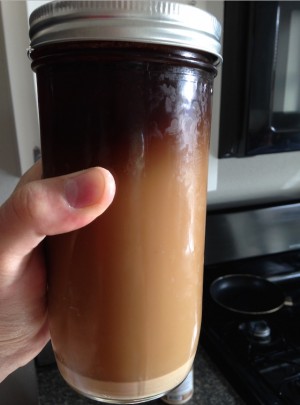
- Allow yeast and trube to separate
- Pour off yeasty liquid into long-term storage vessels

So if you think you can manage keeping those 4 broad concepts in mind, let’s take a look at the more detailed process.
- Rack beer into keg or bottles
- Boil water to get out oxygen, bacteria, and impurities (I used 1 gallon)
- Wait for water to cool so it doesn't kill the yeast
- Transfer to carboy with sanitary funnel
- Swish around to get yeast off of bottom
- Transfer to other sanitary vessel
- Let that vessel sit for 30+ minutes or until you start to see separation lines
- Decant top portion (which is yeast) and leave behind bottom portion (trube)
- Repeat if you want, but one rinsing in enough
- Store in fridge for up to *a few months (Timelines vary from two weeks to MAX six months)
A lot of guys on YouTube and other blogs recommend boiling your mason jars and mid-sized vessel in the water you use to rinse the yeast. However, I found a few problems with that.
- boiling enough water to submerge my 1 gallon jug and mason jars took a long time
- it makes everything super hot and hard to handle
- it takes a long time for everything to cool down
So what I decided to do was boil the water separately, just enough to fill a 1 gallon jug. I then sanitized my jars separately using Starsan exactly how I would sanitize any other equipment on brew day.
Yeast Rinsing VS Acid Washing
Yeast rinsing and yeast “washing” or acid washing are two different things. Most homebrewers will not have the equipment or need to do an acid wash, although if breweries are doing it for yeast health and viability reasons, I can't imagine it would have any effect on your homebrew except to make it better. The question is whether it's cost or time effect to do so when you can just get a new pack for <$10.
Acid washing is done about two hours before pitching and is done to to kill off bacteria and weak yeast cells, but leaves healthy yeast unharmed, keeping your culture pure and strong. You should be using food grade phosphoric acid target pH for the acid wash is 2.0-2.5, as described at ProBrewer.
Common Questions
Do I need a yeast starter when using washed yeast?
Advice varies, but no, you don't need one. Does one help? I'm sure it increases the amount of viable yeast cells, but may reduce the number of generation you get from it.
How many times can I reuse my yeast?
General consensus is a maximum of five generations.
Can I use yeast from a high gravity beer?
No. You should not be reusing yeast from beers higher than 6.5{a60bef903c54612bed20edb95d22500dcc3da56ac2b90be5eb4391998d03cdd5} due to yeast stress from alcohol levels.
How long can I store yeast?
Again, advice varies, but 6 months was the max that I saw. Some people say that you shouldn't be washing yeast at all, unless you immediately pitch, and even then, you run the risk of bacterial infection.
Conclusion
For an infrequent brewer storing yeast might not have the same convenience and money saving results. But it is a good skill to have so you can trade stories at the next homebrewing event.
One thing I’m interested in looking into a bit more is different harvesting techniques. I know some professional brewers as well as traditional brewers do something called “top cropping”, which is harvesting yeast off the top of a beer rather than the bottom.
This be a challenge with my current setup, but I wonder if it’s possible for a homebewer and if it provides any advantages the methods I outlined today.
Have you reused yeast in your homebrewing adventure before and do anything different? Is this your first time and you have some questions that I didn't cover? Let me know in the comments!
I have also started using trub as my yeast source. Unwashed. After racking from the primary I transfer the trub to a mason jar and refrigerate. When I am ready to pitch the trub to a new batch I add 1 tsp. Sugar and one quarter cup of water to the trub and stir. In about 30 minutes it’s ready to pitch. Hasn’t failed me yet. In fact blow over happens more rapidly. And yes 4 to 5 times for re-use is pretty accurate.